Overview
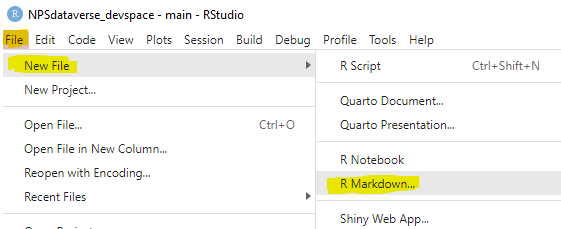
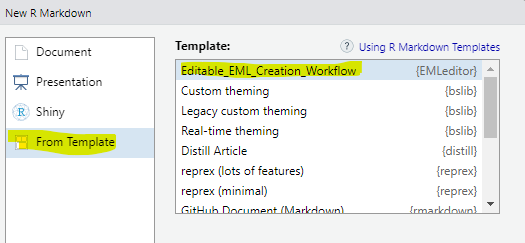
This page mirrors the editable EML Creation template that is included with the EMLeditor package (and has been installed if you installed either EMLeditor on its own or as part of the NPSdataverse). To access an editable version of this script, open R studio and select the “File” drop-down menu. Choose “New File” and select “R markdown” from the submenu. In the pop-up box, select “From Template” and then highlight “Editable_EML_Creation_Workflow {Emleditor}” (likely the first item in the list). Click “OK” to open the template.
Summary
This script acts as a template file for end-to-end creation of EML metadata in R for DataStore. The metadata generated will be of sufficient quality for the data package Reference Type and can be used to automatically populate the DataStore fields for this reference type. The script utilizes multiple R packages and the example inputs are for an EVER Veg Map AA dataset. The example script is meant to either be run as a test of the process or to be replaced with your own content. This is a step by step process where each section should be reviewed, edited if necessary, and run one at a time. After completing a section there is often something to do external to R (e.g. open a text file and add content). Several EMLassemblyline functions are decision points and may only apply to certain data packages. This workflow takes advantage of the NPSdataverse, an R-based ecosystem that includes external EML creation tools such as the R packages EMLassemblyline and EML. However, these tools were not designed to work with DataStore. Therefore, the NPSdataverse and this workflow also incorporate steps from NPS-developed R packages such as EMLeditor and DPchecker. You will necessarily over-write some of the information generated by EMLassemblyline. That is OK and is expected behavior.
Install and Load R Packages
Install packages. If you have not recently installed packages, please re-install them. You will want to make sure you have the latest versions of all the NPSdataverse packages - QCkit, EMLeditor, DPchecker, and NPSutils - as they are under constant development.
If you run into errors installing packages from github on NPS computers you may first need to run:
options(download.file.method="wininet")
#install packages
install.packages(c("devtools", "tidyverse"))
devtools::install_github("nationalparkservice/NPSdataverse")
# When loading packages, you may be advised to update to more recent versions
# of dependent packages. Most of these updates likely are not critical.
# However, it is important that you update to the latest versions of QCkit,
# EMLeditor, DPchecker and NPSutils as these NPS packages are under constant
# development.
library(NPSdataverse)
library(tidyverse)
Generating EML
Set the overall package details
All of the following items should be reviewed and updated to fit the package you are working on. For lists of more than one item, keep the same order (i.e. item #1 should correspond to the same file in each list).
Metadata filename
This becomes the file name of your .xml file. Be sure it ends in _metadata to comply with data package specifications. You do not need to include the extension (.xml).
metadata_id <- "Test_EVER_AA_metadata"Package Title
Give the data package a title. FAIR principles suggest titles of between 7 and 20 words. Be sure to make your title informative and consider how a naive user would interpret it.
package_title <- "TEST_Everglades National Park Accuracy Assessment (AA) Data Package"Path to data file(s)
Tell R where your data files are. If they are in the working
directory, you can set the working_folder to getwd(). If
they are in a different directory you will need to specify that
directory.
working_folder <- getwd()
# or:
# working_folder <- setwd("C:/users/<yourusername>/Documents/my_data_package_folder)
List data files
Tell R what your data files are called.
# if the data files are in your working directory (and the only .csv files in your working directory are data files:
data_files <- list.files(pattern = "*.csv")

# alternatively, you can list the files out manually:
#data_files <- c("qry_Export_AA_points.csv",
#                "qry_Export_AA_VegetationDetails.csv")
Name the data files
These should be relatively short, but perhaps more informative than the actual file names. Make sure that they are in the same order as the files in data_files.
data_names <- c("TEST_AA Point Location Data",
                "TEST_AA Vegetation Coverage Data")
Describe each data file
Data file descriptions should be unique and about 10 words long. Descriptions will be used in auto-generated tables within the ReadMe and DRR. If you need to use more than 10 words, consider putting that information into the abstract, methods, or additional information sections. Again, make sure these are in the same order as the files they are describing.
data_descriptions <- c("TEST_Everglades Vegetation Map Accuracy Assessment point data",
                       "TEST_Everglades Vegetation Map Accuracy Assessment vegetation data")
Placeholder URL for data files
EMLassemblyline needs to know where the data files will be (a URL). However, because you have not yet initiated a draft reference in DataStore, it isn’t possible to specify a URL. Instead, insert a place holder. Don’t worry - this information will be updated later on when you add a Digital Object Identifier(DOI) to the metadata.
Taxonomic information
Specify where you taxonomic information is. this can be a single file or a list of files and fields (columns) with scientific names that will be used to automatically generate the taxonomic coverage metadata. We suggest using DarwinCore for column names, such as “scientificName”. If your data package does not have taxonomic data, skip this step.
# the file(s) where scientific names are located:
data_taxa_tables <- "qry_Export_AA_VegetationDetails.csv"

# the column where your scientific names are within the data files.
data_taxa_fields <- "scientific_Name"
Geographic information
Specify the tables and fields that contain geographic coordinates and
site names. This information will be used to fill out the geographic
coverage elements of the metadata. If your data package does not have
geographic information skip this step. If the only geographic
information you are supplying is the park units (and their bounding
boxes) you can also skip this step; Park Units and the corresponding GPS
coordinates for their bounding boxes will be added at a later step. If
your coordinates are in UTMs and not GPS, try the convert_utm_to_ll()
function in the QCkit
package
data_coordinates_table <- "qry_Export_AA_points.csv"
data_latitude <- "decimalLatitude"
data_longitude <- "decimalLongitude"
data_sitename <- "Point_ID"
Temporal information
This should indicate collection date of the first and last data point in the data package (across all files) and does not include any planning, pre- or post-processing time. The format should be one that complies with the International Standards Organization’s standard 8601. The recommended format for EML is: YYYY-MM-DD, where Y is the four digit year, M is the two digit month code (01 - 12 for example, January = 01), and D is the two digit day of the month (01 - 31). Using an alternate format or setting the date to the future will cause errors down the road!
startdate <- ymd("2010-01-26")
enddate <- ymd("2013-01-04")
EMLassemblyline Functions
The next set of functions are meant to be considered one by one and only run if applicable to a particular data package. The first year will typically see all of these run, but if the data format and protocol stay constant over time it may be possible to skip some in future years. Additionally some datasets may not have geographic or taxonomic component.
FUNCTION 1 - Core Metadata Information
This function creates blank .txt template files for the abstract, additional information, custom units, intellectual rights, keywords, methods, and personnel.
The personnel.txt file can best be edited in excel. You must list at least one person with a “creator” role and one person with a “contact” role (you can list the same person twice for both.). Creators will be authors and included in the data package citation. You do not need to list anyone as the “PI” and can list as many additional people with custom roles as desired (e.g. “field technician”, “laboratory assistant”). Each individual must have a surName. The electornicMailAddress is an email and the userId is the persons’s ORCID (if they have one). List the ORCID as just the 16 digit string, do not include the https://orcid.org prefix (e.g. xxxx-xxxx-xxxx-xxxx). You can leave the projectTitle, fundingAgency, and fundingNumber blank. Contrary to EML assemblyline’s warnings you do not need to have a designated Principle Investigator (PI) listed in the personnel.txt file.
We encourage you to craft your abstract in a text editor, NOT Word. Your abstract will be forwarded to data.gov, DataCite, google dataset search, etc. so it is worth some time to carefully consider what is relevant and important information for an abstract. Abstracts must be greater than 20 words. Good abstracts tend to be 250 words or less. You may consider including the following information: The premise for the data collection (why was it done?), why is it important, a brief overview of relevant methods, and a brief explanation of what data are included such as the period of time, location(s), and type of data collected. Keep in mind that if you have lengthy descriptions of methods, provenance, data QA/QC, etc it may be better to expand upon these topics in a Data Release Report or similar document uploaded separately to DataStore.
Currently this function inserts a Creative Common 0 license. The CC0
license will need to be updated. However, to ensure that the licence
meets NPS specifications and properly coincides with CUI designations,
the best way to update the license information is during a later step
using EMLeditor::set_int_rights(). There is no need to edit
this .txt file.
EMLassemblyline::template_core_metadata(path = working_folder,
                       license = "CC0") # that '0' is a zero!
FUNCTION 2 - Data Table Attributes
This function creates an “attributes_datafilename.txt”
file for each data file. This can be opened in Excel (we recommend
against trying to update these in a text editor) and fill in/adjust the
columns for attributeDefinition, class, unit, etc. refer to https://ediorg.github.io/EMLassemblyline/articles/edit_tmplts.html
for helpful hints and view_unit_dictionary() for potential
units. This will only need to be run again if the attributes (name,
order or new/deleted fields) are modified from the previous year. NOTE
that if these files already exist from a previous run, they are not
overwritten.
EMLassemblyline::template_table_attributes(path = working_folder,
                          data.table = data_files,
                          write.file = TRUE)
FUNCTION 3 - Data Table Categorical Variable
This function Creates a “catvars_datafilename.txt” file for each data file that has columns with a class = categorical. These .txt files will include each unique ‘code’ and allow input of the corresponding ‘definition’.NOTE that since the list of codes is harvested from the data itself, it’s possible that additional codes may have been relevant/possible but they are not automatically included here. Consider your lookup lists carefully to see if additional options should be included (e.g if your dataset DPL values are all set to “Accepted” this function will not include “Raw” or “Provisional” in the resulting file and you may want to add those manually). NOTE that if these files already exist from a previous run, they are not overwritten.
EMLassemblyline::template_categorical_variables(path = working_folder,
                               data.path = working_folder,
                               write.file = TRUE)
FUNCTION 4 - Geographic Coverage
If the only geographic coverage information you plan on using are park boundaries, you can skip this step. You can add park unit connections using EMLeditor, which will automatically generate properly formatted GPS coordinates for the park bounding boxes.
If you would like to add additional GPS coordinates (such as for specific site locations, survey plots, or bounding boxes for locations within a park, etc) please do.
This function creates a geographic_coverage.txt file that lists your sites as points as long as your coordinates are in lat/long. If your coordinates are in UTM it is probably easiest to convert them first or create the geographic_coverage.txt file another way (see QCkit for R functions that will convert UTM to lat/long).
EMLassemblyline::template_geographic_coverage(path = working_folder,
                             data.path = working_folder,
                             data.table = data_coordinates_table,
                             lat.col = data_latitude,
                             lon.col = data_longitude,
                             site.col = data_sitename,
                             write.file = TRUE)
FUNCTION 5 - Taxonomic Coverage
This function creates a taxonomic_coverage.txt file if you have taxonomic data. Currently supported authorities are 3 = ITIS, 9 = WORMS, and 11 = GBIF. In the example below, the function will first try to find the scientific name at ITIS and if it fails will then look at GBIF. If you have lots of taxa, this could take some time to complete.
EMLassemblyline::template_taxonomic_coverage(path = working_folder,
                            data.path = working_folder,
                            taxa.table = data_taxa_tables,
                            taxa.col = data_taxa_fields,
                            taxa.authority = c(3,11),
                            taxa.name.type = 'scientific',
                            write.file = TRUE)
Create an EML object
Run this (it may take a little while) and see if it validates (you
should see ‘Validation passed’). It will generate an R object called
“my_metadata”. The function could alert you of some issues to review as.
Run the function issues() at the end of the process to get
feedback on items that might be missing or need attention. Fix these
issues and then re-run the make_eml() function.
my_metadata <- EMLassemblyline::make_eml(path = working_folder,
               dataset.title = package_title,
               data.table = data_files,
               data.table.name = data_names,
               data.table.description = data_descriptions,
               data.table.url = data_urls,
               temporal.coverage = c(startdate, enddate),
               maintenance.description = data_type,
               package.id = metadata_id,
               return.obj = TRUE,
               write.file = FALSE)
Check for EML validity
This is a good point to pause and test whether your EML is valid.
EML::eml_validate(my_metadata)if your EML is valid you should see the following (admittedly cryptic) result:
# [1] TRUE
# attr(,"errors")
# character(0)
if your EML is not schema valid, the function will notify you of specific problems you need to address. We HIGHLY recommend that you use the EMLassemblyline and/or EMLeditor functions to fix your EML and do not attempt to edit it by hand.
Add NPS specific fields to EML
Now that you have valid EML metadata, you need to add NPS-specific elements and fields. For instance, unit connections, DOIs, referencing a DRR, etc. More information about these functions can be found at: https://nationalparkservice.github.io/EMLeditor/.
Add Controlled Unclassified Information (CUI) codes
This is a required step, using the function
set_cui_code(). It is important to indicate not only that
your data package contains CUI, but also to inform users if your data
package does NOT contain CUI because empty fields can be ambiguous (does
it not contain CUI ordid the creators just miss that step?). You can
choose from one of five CUI dissemination codes. Watch out for the
spaces! These are:
- PUBLIC - Does NOT contain CUI.
- FED ONLY - Contains CUI. Only federal employees should have access (similar to “internal only” in DataStore).
- FEDCON - Contains CUI. Only federal employees and federal contractors should have access (also very much like current “internal only” setting in DataStore).
- DL ONLY - Contains CUI. Should only be available to a named list of individuals (where and how to list those individuals TBD)
- NOCON - Contains CUI. Federal, state, local, or tribal employees may have access, but contractors cannot. More information about these codes can be found at: https://www.archives.gov/cui/registry/limited-dissemination
my_metadata <- EMLeditor::set_cui_code(my_metadata, "PUBLIC")
# note that in this case I have added the CUI code to the original R object,
# "my_metadata" but by giving it a new name, i.e. "my_meta2" I could have
# created a new R object. Sometimes creating a new R object is preferable
# because if you make a mistake you don't need to start over again.
Intellectual Rights
EMLassemblyine and ezEML provide some attractive looking boilerplate
for setting the intellectual rights. It looks reasonable and so is easy
to just keep. However, NPS has some specific regulations about what can
and cannot be in the intellectualRights tag. Use
set_int_rights() to replace the text with NPS-approved
text. Note: You must first add the CUI dissemination code using
set_cui() as the dissemination code and license must agree.
That is, you cannot give a data package with a PUBLIC dissemination code
a “restricted” license (and vise versa: a restricted data package that
contains CUI cannot have a public domain or CC0 license). You can choose
from one of three options, but for most public NPS data
packages, the CC0 license is appropriate:
“restricted”: If the data contains Controlled Unclassified Information (CUI), the intellectual rights must read: “This product has been determined to contain Controlled Unclassified Information (CUI) by the National Park Service, and is intended for internal use only. It is not published under an open license. Unauthorized access, use, and distribution are prohibited.”
“public”: If the data do not contain CUI, the default is the public domain. The intellectual rights must read: “This work is in the public domain. There is no copyright or license.”
“CC0”: If you need a license, for instance if you are working with a partner organization that requires a license, use CC0: “The person who associated a work with this deed has dedicated the work to the public domain by waiving all of his or her rights to the work worldwide under copyright law, including all related and neighboring rights, to the extent allowed by law. You can copy, modify, distribute and perform the work, even for commercial purposes, all without asking permission.”
The set_int_rights() function will also put the name of
your license in a field in EML for DataStore harvesting.
# choose from "restricted", "public" or "CC0" (zero), see above:
my_metadata <- EMLeditor::set_int_rights(my_metadata, "CC0")
Add a data package DOI
Add your data package’s Digital Object Identifier (DOI) to the
metadata. The set_datastore_doi() function requires that
you are logged on to the VPN. It initiates a draft data package
reference on DataStore, and populates the reference with a title pulled
from your metadata, “[DRAFT] : set_datastore_doi() function will then
insert the corresponding DOI for your data package into your metadata.
Now that a draft reference has been initiated on DataStore, it is
possible to fill in the online URL for each data file.
set_datastore_doi() automatically does that for you too.
There are a few things to keep in mind: 1) Your DOI and the data package
reference are not yet active and are not publicly accessible until after
review and activation/publication. 2) We suggest you NOT manually upload
files. If you manually upload your files, be sure to upload your data
package to the correct draft reference! It is easy to create several
draft references with the same draft title but different DataStore
reference IDs and DOIs. So check the reference ID number carefully 3)
There is no need to fill in additional fields in DataStore at this point
- many of them will be auto-populated based on the metadata you upload.
Any fields you do populate will be over-written by the content in your
metadata.
my_metadata <- EMLeditor::set_datastore_doi(my_metadata)Add information about a DRR (optional)
If you are producing (or plan to produce) a DRR, add links to the DRR describing the data package.
You will need the DOI for the DRR you are drafting as well as the DRR’s Title. Go to DataStore and initiate a draft DRR, including a title. For the purposes of the data package, there is no need to populate any other fields. At this point, you do not need to activate the DRR reference and, while a DOI has been reserved for your DRR, it will not be activated until after publication so that you have plenty of time to construct the DRR.
my_metadata <- EMLeditor::set_drr(my_metadata, 7654321, "DRR Title")Set the language
This is the human language (as opposed to computer language) that the data package and metadata are constructed in. Examples include English, Spanish, Navajo, etc. A full list of available languages is available from the Libraryof Congress. Please use the “English Name of Language” as an input. The function will then convert your input to the appropriate 3-character ISO 639-2 code.Available languages: https://www.loc.gov/standards/iso639-2/php/code_list.php
my_metadata <- EMLeditor::set_language(my_metadata,
                                       "English")
Add content unit links
These are the park units where data were collected from, for instance ROMO, not ROMN. If the data package includes data from more than one park, they can all be listed. For instance, if data were collected from all park units within a network, each unit should be listed separately rather than the network. This is because the geographic coordinates corresponding to bounding boxes for each park unit listed will automatically be generated and inserted into the metadata. Individual park units will be more informative than the bounding box for the entire network.
park_units <- c("ROMO", "GRSA", "YELL")
my_metadata <- EMLeditor::set_content_units(my_metadata,
                                            park_units)
Add the Producing Unit(s)
This is the unit(s) responsible for generating the data package. It may be a single park (ROMO) or a network (ROMN). It may be identical to the units listed in the previous step, overlapping, or entirely different.
# a single producing unit:
my_metadata <- EMLeditor::set_producing_units(my_metadata,
                                              "ROMN")
# alternatively, a list of producing units:
my_metadata <- EMLeditor::set_producing_units(my_metadata,
                                              c("ROMN", "GRYN"))
Add a project (optional)
You can add a DataStore project to your metadata. Once the metadata are extracted on DataStore, your data package will automatically be added to the DataStore project. A few things to keep in mind: 1) DataStore only supports one project connection and will use the first DataStore project in your metadata (although you can have many other projects). 2) DataStore will only make connections between data packages and projects; it will not remove them. If you want to remove the connection you must do it manually via the web interface. 3) The project must be public to add it to metadata. 4) Whoever uploads and extracts the metadata on DataStore must have ownership level permissions on both the data package and the project.
# where "1234567" is the DataStore Reference id for the Project
# that the data package should be linked to.
my_metadata <- EMLeditor::set_project(my_metadata, 1234567)
Validate your EML
Almost done! This is another great time to validate your EML and make sure Everything is schema valid. Run:
EML::eml_validate(my_metadata)if your EML is valid you should see the following (admittedly crypitic):
# [1] TRUE
# attr(,"errors")
# character(0)
if your EML is not schema valid, the function will notify you of specific problems you need to address. We HIGHLY recommend that you use the EMLassemblyline and/or EMLeditor functions to fix your EML and do not attempt to edit it by hand.
Write your EML to an xml file
Now it’s time to convert your R object to an .xml file and save it. Keep in mind that the file name should end with “_metadata.xml”.
EML::write_eml(my_metadata, "mymetadatafilename_metadata.xml")Check your .xml file
You’re EML metadata file should be ready for upload. You can run some additional tests on your .xml metadata file. This function assumes there is only one .xml file in the directory:
# This assumes that you have written your metadata to an .xml file and that the .xml file is in the current working directory.
DPchecker::run_congruence_checks(check_metadata_only = TRUE)

# If you .xml file with metadata is in a different directory, you will have to specify that:
# DPchecker::run_congruence_checks("C:/Users/<yourusername>/Documents/my_data_package", check_metadata_only = TRUE)
Check your data package
If your data package is now complete, you can run some test prior to upload to make sure that the package fits some minimal set of requirements and that the data and metadata are properly specified and coincide. This assumes that your data package is in the root of your R project. It will run all of the checks in the code chunk directly above “check your .xml file” and then some!
# this assumes that the data package is the working directory
DPchecker::run_congruence_checks()

# if your data package is somewhere else, specify that:
# DPchecker::run_congruence_checks("C:/Users/<yourusername>/Documents/my_data_package")
Upload your data package
If everything checked out, you should be ready to upload your data
package! We recommend using upload_data_package() to
accomplish this. The function automatically checks your DOI and uploads
to the correct reference on DataStore. All of your files for the data
package need to be in the same folder, there can be only one .xml file
(ending in “_metadata.xml”) and all the other files should be data files
in .csv format. Each individual file should be < 32Mb. If you have
files > 32Mb, you will need to upload them manually using the web
interface on DataStore.
# this assumes your data package is in the current working directory
EMLeditor::upload_data_package()

# If your data package is somewhere else, specify that:
#upload_data_package("C:/Users/<yourusername>/Documents/my_data_package)
From within DataStore you should be able to extract all the information from the metadata file to populate the relevant DataStore fields. In the upper right, select “Edit” from the drop down menu. Then click on the “Files and Links” tab. On the left side of the files list, select the radio button corresponding to your metadata. Then click the “Extract Metadata” button from the top right of box with the files listed in it.
Please don’t activate your reference just yet! Data package references need to be reviewed prior to activation. We are still working on what that review process will look like.